Rhino PyCharm autocomplete

Rhino Mac PyCharm autocomplete

Here is how I set up my PyCharm IDE to program in Rhino Mac, so I can have a nice autocompletion functionality for the RhinoCommon and rhinoscriptsyntax. First, I install the python stubs to my created conda environment. This makes sure that we will have the autocomplete for the RhinoCommon API. $ conda create -n your-env-name $ conda activate your-env-name $ pip install Rhino-stubs To use specific environment in PyCharm, we will have to select the right environment for the project. This can be set in PyCharm -> Preferences -> Project: your-project-name -> Python Interpreter. Normally, our environment python is located at ~/anaconda3/envs/your-env-name/bin/python. ...

November 6, 2020 · 1 min · Gene Ting-Chun Kao
PhysX.GH demo

PhysX.GH

About PhysX.GH is a rigid body simulation tool for Grasshopper. It uses open source real-time physics engine NVIDIA PhysX and a C# wrapper from stilldesign/PhysX.Net. It runs with GPU and provides users with fast simulation results. Download: https://www.food4rhino.com/app/physxgh Forum: https://www.grasshopper3d.com/group/physx-gh License PhysX.GH © 2016-2020 Gene Ting-Chun Kao, Long Nguyen and The Asian Coders.

January 1, 2019 · 1 min · Gene Ting-Chun Kao
Leopard GH plugin

Leopard

Leopard - A new way to process mesh in Grasshopper, a cool GH plugin. We are pleased to announce our new plugin for Grasshopper: “Leopard” http://www.grasshopper3d.com/group/leopard Leopard is an open source mesh processing solution for grasshopper that allows users to interact with rhino geometry and create customised mesh shapes. By selecting Mesh vertices, edges and faces, users have more freedom to edit meshes intuitively and use different subdivision schemes to selectively choose multiple areas to fix. ...

February 21, 2017 · 1 min · Gene Ting-Chun Kao
Video thumbnail

ICD/ITKE Research Pavilion 2015-16 - development and implementation demo

I was in the computational design team while designing the ICD/ITKE Research Pavilion 2015-16 and was mainly in charge of developing computational tools. Here is the demonstration video to show the geometrical implementation. One of the input parameters from the plugin is a mesh surface, and the output parameters are all tree data structure thus some double-layer light weight structure as well as some planar plates can be generated (Planar plate wasn’t realized due to the decision making and scheduling during the development). All the geometries are labeled in the right sequence so they can be fabricated directly: ...

October 30, 2016 · 1 min · Gene Ting-Chun Kao
Rhino.Python Swarm Bridge

Rhino.Python

These are my Rhino.Python practice while I studied at Stuttgart University. 
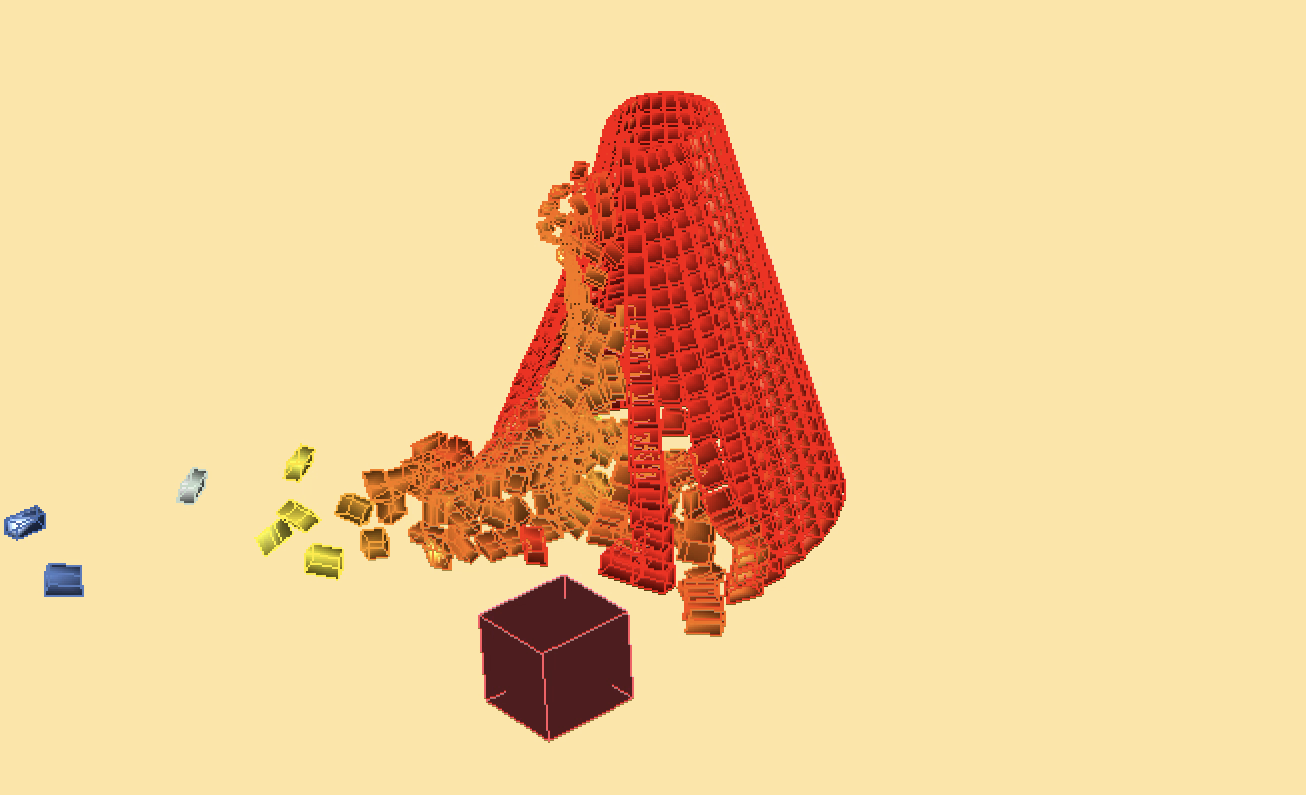
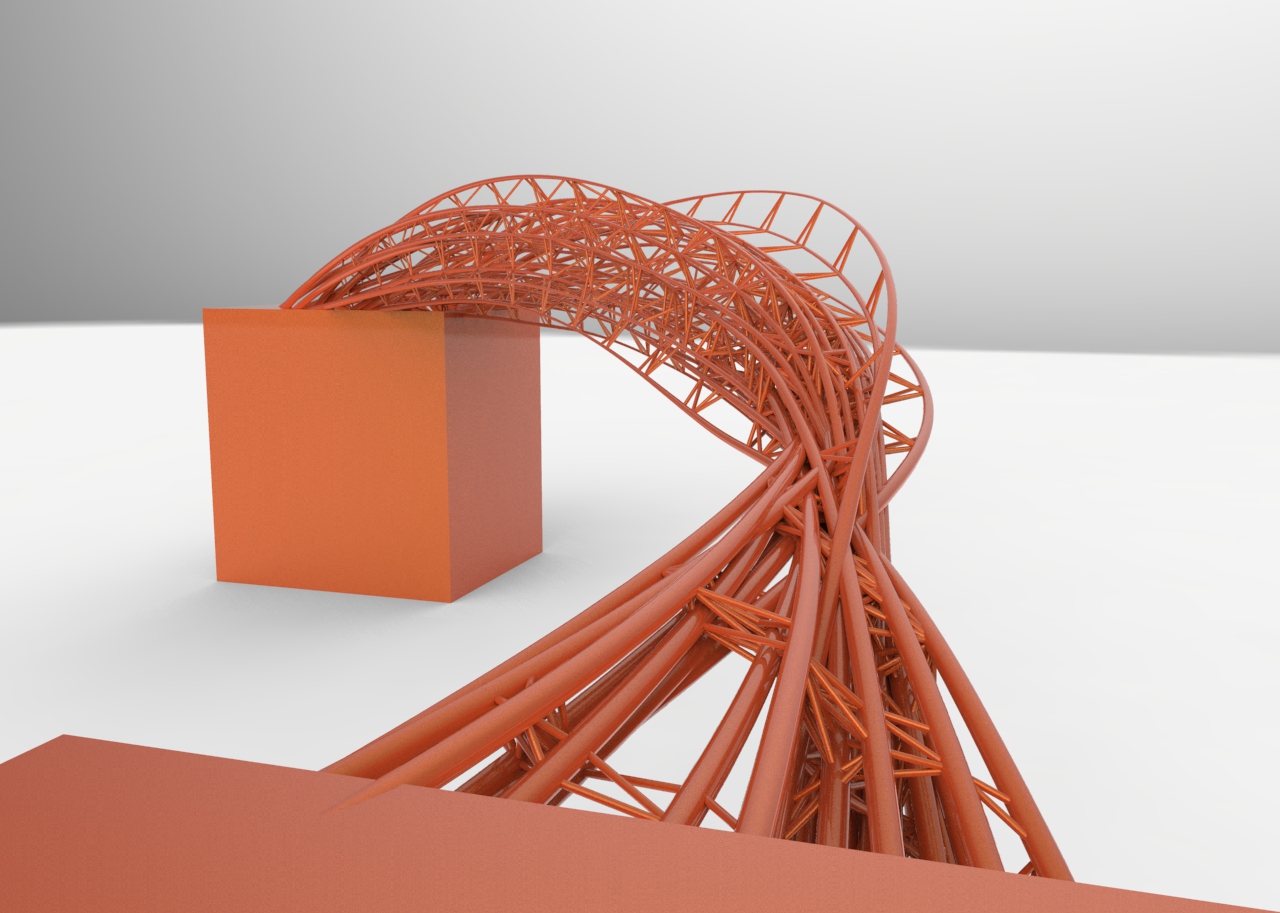
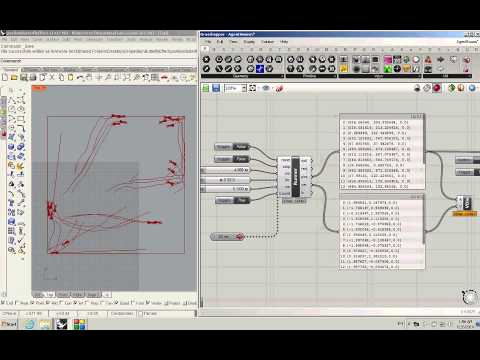
Rhino.Python - 1D 2D 3D Rhino.Python - Swarm bridge Rhino.Python - tessellation and subdivision Rhino.Python - Boy Surface and subdivision Rhino.Python - 1D 2D 3D """ #################################################################### Computational Design Assignment 02 Kao, Ting-Chun Assignment to use for loop #################################################################### """ from scriptcontext import doc, escape_test import rhinoscriptsyntax as rs import Rhino.Geometry as rg import Rhino.DocObjects as rd import Rhino import time import System.Guid as guid import System.Drawing as sd import math import random dimension = rs.GetInteger("give me one to three dimension: ", 2, 1, 3) print(dimension) # some functions def PtMat(x, y, z): pt = rg.Point3d(x, y, z) materialIndex = doc.Materials.Add() material = doc.Materials[materialIndex] if dimension == 2: if x > 0 and y>0 and z>0: material.DiffuseColor = sd.Color.FromArgb(y/5*255*0.5, y/5*255*0.5, y/5*255) else: material.DiffuseColor = sd.Color.FromArgb( 255, abs(math.sin(x))*255, 255) material.CommitChanges() attr = Rhino.DocObjects.ObjectAttributes() attr = rd.ObjectAttributes() attr.MaterialSource = Rhino.DocObjects.ObjectMaterialSource.MaterialFromObject attr.MaterialIndex = materialIndex if dimension == 2: sphere = rg.Sphere(pt, (y+5)/5) elif dimension == 3: sphere = rg.Sphere(pt, 0.2) else: sphere = rg.Sphere(pt, 2) if doc.Objects.AddPoint(pt, attr) != guid.Empty: doc.Objects.AddSphere(sphere, attr) return pt def noneLoopPt(): pt = PtMat(i*math.sin(5*i), i*math.cos(5*i), i) return pt def oneLoopCrv(): pts = [] for x in range(50): y = math.sin(x) * math.sin(i) pts.append(PtMat(5*x, 5*y, 5*i)) crv = rs.AddCurve(pts) return crv def twoLoopCrv(): pts = [] crvs = [] for x in range(30): for y in range(40): a = ( i + math.cos(x/2)*math.sin(y) - math.sin(x/2)*math.sin(2*y) ) * math.cos(x) b = ( i + math.cos(x/2)*math.sin(y) - math.sin(x/2)*math.sin(2*y) ) * math.sin(x) c = 10*math.sin(x/2)*math.sin(y) - math.cos(x/2)*math.sin(2*y) pts.append(PtMat(a, b, c)) crv = rs.AddCurve(pts) crvs.append(crv) return crvs def threeLoopSrf(): # haven't getten any idea to having a good one. return 0 def drawTime(): FPS = 30 last_time = time.time() # setup variables global i i = 3 curves = [] pts = [] # whatever the loop is... while True: # draw animation if dimension == 3: i += 3 else: i += 1 # pause so that the animation runs at 30 fps new_time = time.time() # see how many milliseconds we have to sleep for # then divide by 1000.0 since time.sleep() uses seconds sleep_time = ((1000.0 / FPS) - (new_time - last_time)) / 1000.0 if sleep_time > 0: time.sleep(sleep_time) last_time = new_time if dimension == 2: crv = oneLoopCrv() curves.append(crv) if i > 20: rs.AddLoftSrf(curves) break elif dimension == 3: curves = twoLoopCrv() escape_test() else: pt = noneLoopPt() pts.append(pt) if i > 80: #rs.AddLoftSrf(curves) rs.AddCurve(pts) break escape_test() def main(): drawTime() if __name__ == "__main__": main() Rhino.Python - Swarm Bridge Swarm Behavior + Attractor : Agent methods: 1. Align : Move in the same direction as your neighbours. 2. Cohesion : Remain close to your neighbours. 3. Seperation : Avoid collisions with your neighbours. Attractor methods: (Controlling the shape) From starting points move to target points to create bridge. Using swarm simulation in Grasshopper is in this post: Swarm Python GH Component ...

November 30, 2014 · 11 min · Gene Ting-Chun Kao
Butterfly Effect Pavilion

Butterfly Effect Pavilion in I-Lan Green Expo 2014

–蝶跡– Description: 蝶跡的設計啓發於蝴蝶幼蟲,生長成蝴蝶展翅瞬間的造型,以用於圍塑空間形態以及外觀紋理。在結構上也與蝴蝶翅膀振動為靈感之啓發,以最輕薄的木夾板去挑戰材料之彎曲性與結構性,進而產生動態平衡。另外在構造上運用電腦運算技術使複雜造型由416片單元組合而成,以極簡的拉鍊扣合做法連接單元與單元進而產生極複雜細部,在正反的拱肋結構演算下,整體重量平均分攤至7個底座,使整體結構輕量化。 實際走入蝶跡展示庭,空間經驗上,太陽撒入木板因彎曲曲度而刻畫的開口中,微風飄動過整體結構,結構體輕輕飄動而陽光如在樹蔭下似閃爍,就像蝴蝶翩翩起舞輕過留下痕跡一般優雅。 –pavilionButterflyEffect_Geometry– Not-found –pavilionButterflyEffect_step01 Definition– –pavilionButterflyEffect_step02 Definition– –pavilionButterflyEffect_step03 Definition– Not-found –pavilionButterflyEffect_step04 Definition– Not-found –Geometry Size Selection Filter Python Code– ### --Written by Gene Ting-Chun Kao-- ### import rhinoscriptsyntax as rs ids = rs.GetObjects("select surfaces", rs.filter.polysurface) area = rs.GetInteger("selected area limits", 10, 0) rs.EnableRedraw(False) print "Results: All", len(ids), "surfaces selected." Count = 0 for i in ids: b = rs.SurfaceArea(i) if b: if b[0] < area: rs.SelectObject(i) Count += 1 print "Results: Get", Count, "small objects." rs.EnableRedraw(True)

June 26, 2014 · 1 min · Gene Ting-Chun Kao
Swarm Python Component

Swarm Python Component

Swarm in Grasshopper using GH_Python component. Testing swarm behaviour in Rhino is in this post: Rhino.Python Swarm Bridge For more discussion please visit my post in grasshopper example forum. GH_Python Code: ### --Written by Gene Ting-Chun Kao-- ### ghenv.Component.Message = "written by +GENEATCG" import rhinoscriptsyntax as rs import Rhino as rc from random import * rectX = 600 rectY = 600 class Runner: def __init__(self, p, v): self.p = p self.v = v self.a = rs.VectorCreate( (0,0,0),(0,0,0) ) def ptRun(self): self.v = rs.VectorAdd(self.v, self.a) v = rs.VectorLength(self.v) if v > 2: self.v = rs.VectorScale(rs.VectorUnitize(self.v), 2) self.p = rs.VectorAdd(self.p, self.v) self.a = rs.VectorCreate( (0,0,0),(0,0,0) ) # ... (full code on GitHub)

June 25, 2014 · 1 min · Gene Ting-Chun Kao
LEGO Component for 3D Printing

LEGO Component for 3D Printing

在Rhino3D軟體裡用python程式語言 創造客制化的樂高原件。 LEGO customised components developed through Python script using Rhino 3D software. We can design our own LEGO components via 3D printer. Mouse left click → make LEGO up part Mouse right click → make LEGO down part How it works: Replace any surface with a LEGO unit. Dimensions reference here. Trim a hole. Extrude surfaces. Join all faces.

December 14, 2013 · 1 min · Gene Ting-Chun Kao